Friday, July 18, 2014

Building Garden Boxes

When we bought this house, it didn't come with a garden spot.  I am not a fantastic gardener, but I do love having a garden growing in the summer time.  So, this Spring, I made it my mission to put in a garden and grow something in it.  The lot came with a rocky landscaped spot next to the driveway, and just off the kitchen, so I figured it was as good a spot as any to put some raised beds.  We have crazy wind up here on our hill, so I was trying to find a somewhat sheltered spot to put the garden.  I hoped the house would kind of block the wind and give the garden a chance.  I went to a local fencing supply company and got vinyl fence posts and fence slats to do raised beds.  They were kind enough to cut out the fence posts so that all I had to do was assemble the beds once I got them home.  I just had to move rocks, cut through the landscape fabric underneath, and stick in the posts.


The ground underneath was soft, so it was a pretty easy job to assemble three 4x8' beds.  Getting them level on a sloping lot was probably the trickiest part, but even that wasn't bad.  I figured putting the beds on the rocks would keep out weeds and provide nice walkways between the beds for weeding and maintaining the garden.  Here are the beds assembled, before the dirt was added:


Since some of you may be interested, I spent just under $250 for the three garden boxes.  Not the cheapest way to build them, but I researched and researched and decided that a no maintenance/lasts forever solution was the way I wanted to go for garden areas.  I had vinyl boxes at our last home, loved them, and knew that I wanted them for our home here.

Once I got the boxes built, we went to a local nursery and ordered 3 cubic yards of garden soil.  


Then, I put our kids and the neighbor kids to work transferring dirt from the driveway to the garden boxes.  We had justenough dirt for each box, and probably should have ordered 4 cubic yards of dirt, but we went and bought 3 bags of dirt to top them off and called it good.  


And then I realized that the wind was blowing half the dirt out of the boxes, so I put up a little wind break:  


That seemed to help mitigate the wind a little.  And then the hail came: 


But, miraculously, my little-plants-that-could have seemed to survive the elements.  I even noticed several zucchini growing the other day: 


We started small this year--some zucchini, some banana squash, tomatoes, and a few herbs.  Hopefully next year will be even bigger.  And eventually we'll find a more aesthetic solution for a wind break.  A picket fence maybe?  I'm scouring Pinterest daily for ideas.  

If you are interested in making your own vinyl garden boxes, may I recommend this tutorial.  And may I also recommend skipping Home Depot or Lowes and looking to a local fencing supply company for materials.  It was over 1/3 cheaper for us to go that route.  If you have any additional questions, please feel free to ask in the comments.

Thanks for stopping by!

Thursday, July 17, 2014

Dining Set Makeover

So, here's the dining set before:
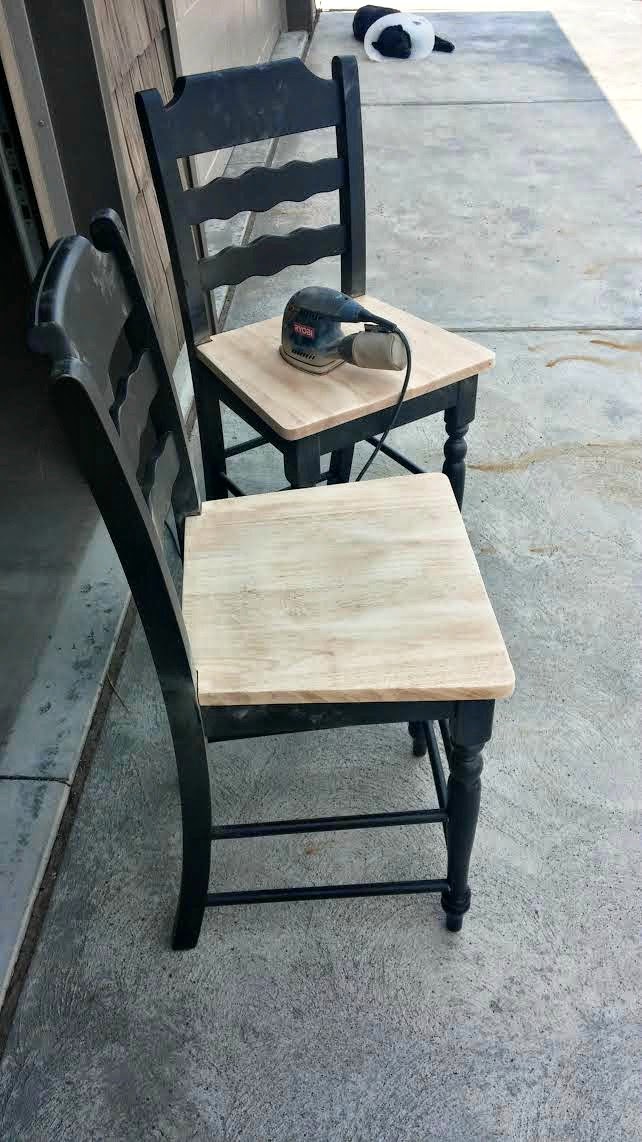
We got it on Craigslist for a steal, but it was not the style I wanted, so I decided to give it a makeover.  I started with the chairs.  I used my handy dandy handheld sander and took the finish off the seats:

Here's a sanded one next to a still stained one:


I timed the process, and it was about 10 minutes on the nose to completely sand a chair seat.  Not too bad of a time commitment, for such a drastic change.


Once the seats were sanded, I lightly sanded the legs and backs of the chair.  Lightly meaning I just ran quickly over it with my palm sander so that the paint was roughed up just a touch.  Don't spend more than a minute on it, because it's unnecessary to do more than just a once over.  I covered the seats completely with paper and Frog Tape to protect them during the next several steps.  I used my kids' construction paper, because it's what was handy.


Next, I used spray primer to cover the black parts of the chair.  I loved using Rustoleum's Painter's Touch 2X's Ultra Cover primer in flat white.  I didn't worry about completely covering any traces of black.  I just did a light coat so that the paint would have something to stick to.


I let that dry for an hour or so, and then I went at it with my spray paint color.  I used Krylon's Catalina Mist.  And I'll tell you two things.  1) I LOVE the color. 2) It is not great quality spray paint.  It runs easily and doesn't provide great coverage.  Rustoleum knocks it out of the park with coverage and non-runniness.  Krylon, not so much.  So, it took a lot of really light coats to get it all covered, and I ended up averaging an entire can of spray paint per chair.  So, although I do love the color, I'd say if you can find a color you love in a Rustoleum can, I'd definitely vote you go for that one instead.  The Catalina mist was also ridiculously hard to find (and then find again when I ran out part way through the project).  So, for what it's worth.  Great color.  Not great quality.  I was warned by lots of reviewers on Amazon and other sites, but I wanted the color badly enough that I was willing to put up with the poor quality.  I won't be doing that again, though.  Not worth it in my book.

When everything was all dry, I removed the paper and tape off the seats and gave it 3 coats of polyacrylic, which I found here and love.

So, that's the chairs.  The table was a very similar story.  I detached the legs, carried everything out to my workshop (a.k.a. the garage where I should really be parking my car), and went to town.  I sanded the top down, then I covered the entire top with paper and tape and spray primed the base and legs with the Rustoleum primer, followed by several coats of Rustoleum spray paint in white.


Again, I cannot state emphatically enough how awesome Rustoleum covers and goes on compared to Krylon.  And, no, Rustoleum has no clue who I am and I'm not getting paid to say that.  It's just true.  After the paint dried, I removed the paper and did 4 or 5 coats of polyacrylic over the natural wood top.

After everything dried, I brought it all back in, reassembled it, and let it cure for a week while we went on a planned vacation.  We came back to a fully functional and much brighter dining set.


Any questions?  Put them in the comments and I'll do my best to answer them!

Tuesday, June 10, 2014

Pillow Fun

I love to find fabric at Target for pillows.  What's that, you say?  It's not a fabric store?  Right you are.  But, I'm in love with so many of their fabrics in their table linens section that I pretend it's a fabric store, so it all works out.  I've used Target table cloths as curtains before (more than once), and I love to turn their placemats and napkins into pillow covers.  Often, the fabric patterns are the same as what they sell on their actual pillows for a whole lot more just an aisle over.  Sometimes it's as easy as seam ripping open a placemat end, stuffing a pillow form in there, and sewing it back up.  But, I decided to try something different this time and made a removable (and thus washable) envelope pillow cover.  I found a set of four napkins in a fabric I liked.  I only used three for this pillow.  One was the front of the pillow cover.  Then I overlapped two on the back to make the envelope side.  Then I pinned it all together, cut off the excess and sewed a few straight lines.  Voila!  I beautiful pillow cover that's removable and easy to make.  And here are a few pictures.  Here's the seam on the back (using the finished edges of the napkins, so I didn't even have to worry about sewing them myself):
Here's the backside: 
And here's the front:
Super easy and inexpensive.  Let me know if you have any questions!

Dining Room Makeover

When we moved into this house a year ago, and it was the nicest house we've ever lived in, so I was kind of afraid to make any big changes.  I think I'm over that now, and I realize that it's our house and we can make it reflect who we are, instead of trying to "not ruin" some perfectly fine and beautiful finishes that don't fit us.  So, the dining room got a makeover.  I painted all of the trim/casings/doors Behr's Ultra Pure White to replace all the cream/off-white color that was in there.  I took down the gorgeous plantation shutters to spray them bright white and put them back up, but I found that I actually really loved the open windows which allow a beautiful view of where we live.  So, I left them off.  I painted the walls Benjamin Moore's Ashwood, color matched to Behr paint and Home Depot.  I also replaced all the outlets and light switches from almond to white.  The table and chairs is a separate post, but I love them, too.  This space is so light and bright and airy now.  It totally fits me and makes me happy.  Here's the before and after:

Monday, April 7, 2014

Recliner Makeover

So, friends.  This chair.
Let me just tell you a little story about this chair.  This was a surprise Mother's Day gift back when my oldest was a baby.  Umm, that was about 1999.  My husband is (ahem) not a great secret keeper, so the fact that he actually surprised me with this was pretty amazing.  It was really pretty trendy, back in the late '90's, and it is ridiculously comfortable.  I nursed all of my babies in this chair.  I slept with stuffy and sick toddlers in this chair.  I have so many sweet memories of our chidren's childhoods in this chair.  Watching movies.  Reading stories.  Snuggling.  

But, let's be honest.  It's been past its prime for a fair few years now.  It had become threadbare and homely.  In fact, a year or two ago, Mr. Jones and I took this guy to the local thrift store and dropped it off, and drove away.  And as we drove off, a huge wave of mother nostalgia swept over me and I started to bawl.  So, we turned around.  Mr. Jones went into the thrift store and begged for the chair back.  It was already headed out to the sales floor, but they let us take it back.  

We've been planning to have it refinished professionally since then.  I'm all for DIYing, but this seemed a little out of my league.  I mean, it had moving parts and I've never done any upholstery work in my life.  But, then it sat.  And sat.  And sat some more.  'Cause it's expensive to hire someone to reupholster a Laz-E-Boy, and kind of a hassle.  And, beyond that, I couldn't settle on a new fabric for the makeover.

Fast forward to a couple of weeks ago.  I finally had had enough of this eye sore in my bedroom, and I got serious looking for fabric.  I finally found upholstery weight fabric I loved on fabric.com.   (You can see it on the bolt sitting on the chair in the picture above.)  It was a pretty grey slub, and was on sale for $7.50 a yard.  So, I swallowed hard, ordered 10 yards (because I was paranoid of running short--ended up being probably a yard and a half too much), and waited for it to arrive.  And by the time it got here, a couple of weeks later, I'd convinced myself I could just go for it and do the job myself.

So, I read several online tutorials on recovering a Laz-E-Boy.  Like this one.  And this one was especially helpful.  And then I just took a deep breath, embraced the fear, and started ripping my beloved Mother's Day chair apart.  It took about 3 days and lots of patience and tedious work, but it wasn't as bad as I feared it would be. I really had no clue to what extent furniture is held together with cardboard and staples:
Like, a whole lot of cardboard and staples.  But, as I took it apart, I took pictures as I went, used the pieces I removed as patterns for the new fabric, and it wasn't as bad as I feared it might be.  I would highly recommend using a pneumatic staple gun.  I already owned an air compressor, so I bought this gun on Amazon for less than $25.  Word to the wise, people.  It came dead on arrival.  Wouldn't shoot staples at all.  Just poofs of air.  Mr. Jones is a handy guy, though, and he took the whole thing apart, put it back together again, and he somehow got it working, and I really had no problems at all after that.  But, you might want to just head to a home improvement store, spend a few more dollars, and not worry about having to rebuild a brand new staple gun.  Just sayin'.  

Also, hot glue.  I totally used my hot glue gun (like, the high temperature, heavy duty kind) on this baby, in all the places where I couldn't actually use staples.  I was a little worried about the holding power at first, until I made a mistake and had to try to remove something that was hot glued on.  Dude.  It was harder to get off than the staples.  I feel totally confident in the staying power of hot glue now.  I mostly used it to attach the two strips down the front of the chair from the arm rests, and a little section of the back of the chair.  And they are on there very solidly.  

Here are some pictures of the finished product:


I love it.  It is still just as comfortable, and it looks a million times better.  If you have any questions or want more detail, just ask away in the comments and I'll try to help you out, if I can.  I would for sure say that if I can do this, anyone can do this.  It just takes a lot of patience and some tedious work, but I love how it turned out and am glad I saved us hundreds of dollars and still got a chair that I really love.  

Thanks for stopping by!

Saturday, August 10, 2013

Dressing the Dresser

I decorated the pink dresser! It probably won't stay this way forever, because let's face it, I have decorating ADHD, but for now, I'm enjoying it. I spray painted the mirror (which used to hang in our entryway in our old house and was white) Antique Gold, because gold is kind of all the rage in decorating right now and also because I had a can of Antique Gold spray paint that my mother-in-law gifted me a few years ago. Then, I stuck a lamp in the mix. That lamp used to be glass and brass, until I got a can of black spray paint on it. Then a picture of my youngest and a framed saying that I found on Pinterest finish out the look.  Oh, and that Be-YOU-tiful sign was a Girl's Camp craft this summer.    Also, a couple of her paper creations to make it her own. Okay, and one more thing before I turn you loose on the pictures. The mirror is smudged. I know. It bugs me, too. Just not enough to go clean it and take more pictures. Okay? Okay then. Thanks for your understanding.


Only a couple more tweeks, and the room will be done.  Yay!

Wednesday, August 7, 2013

Dresser Redo

I'm still working on my youngest's room redo. I decided to bring in a dresser that we were using in the living room:
I L.O.V.E. this dresser.  I got it on ksl.com (the classified section) for $50 a year or so ago, spray painted the hardware oil rubbed bronze, painted the dresser Benjamin Moore's Wythe Blue (LOVE that color), and it is seriously one of my favorite pieces of furniture.  The picture above is from our last house, but we were using it very similarly in the living room of our current home.  Mr. Jones and I decided that a desk would serve us better in our living room here, so I pulled this guy into my youngest's room, because I liked the scale of it better than the white one that was currently in there:
That white dresser is mine from childhood, by the way.  I still love it and will find another place in the house for it.  But, for this room redo, the blue dresser was the perfect match.  Except for the blue.  As much as I adore Wythe Blue, it just didn't go in this gray and pink space.  So, I pulled out the Priscilla (Sherwin Williams) pink paint that I used to paint the stripe around the room, mixed it with some lighter pink paint that I used in my oldest's room (Benjamin Moore's Wild Aster), and came up with a pale, soft pink that I love!  
You can kind of tell in this next photo, but it's so subtle that it's hard to photograph, I painted the drawers in varying gradients of pink, starting with the darkest on the bottom, then adding the lighter paint to the mix the farther I went up.  Like I said, it's very subtle, but it makes me happy to have ombre drawers.


So, now we're one step closer to a finished room.  I have some fun stuff up my sleeves for this space.  I can't wait to see it all come together!