Friday, July 18, 2014

Building Garden Boxes

When we bought this house, it didn't come with a garden spot.  I am not a fantastic gardener, but I do love having a garden growing in the summer time.  So, this Spring, I made it my mission to put in a garden and grow something in it.  The lot came with a rocky landscaped spot next to the driveway, and just off the kitchen, so I figured it was as good a spot as any to put some raised beds.  We have crazy wind up here on our hill, so I was trying to find a somewhat sheltered spot to put the garden.  I hoped the house would kind of block the wind and give the garden a chance.  I went to a local fencing supply company and got vinyl fence posts and fence slats to do raised beds.  They were kind enough to cut out the fence posts so that all I had to do was assemble the beds once I got them home.  I just had to move rocks, cut through the landscape fabric underneath, and stick in the posts.


The ground underneath was soft, so it was a pretty easy job to assemble three 4x8' beds.  Getting them level on a sloping lot was probably the trickiest part, but even that wasn't bad.  I figured putting the beds on the rocks would keep out weeds and provide nice walkways between the beds for weeding and maintaining the garden.  Here are the beds assembled, before the dirt was added:


Since some of you may be interested, I spent just under $250 for the three garden boxes.  Not the cheapest way to build them, but I researched and researched and decided that a no maintenance/lasts forever solution was the way I wanted to go for garden areas.  I had vinyl boxes at our last home, loved them, and knew that I wanted them for our home here.

Once I got the boxes built, we went to a local nursery and ordered 3 cubic yards of garden soil.  


Then, I put our kids and the neighbor kids to work transferring dirt from the driveway to the garden boxes.  We had justenough dirt for each box, and probably should have ordered 4 cubic yards of dirt, but we went and bought 3 bags of dirt to top them off and called it good.  


And then I realized that the wind was blowing half the dirt out of the boxes, so I put up a little wind break:  


That seemed to help mitigate the wind a little.  And then the hail came: 


But, miraculously, my little-plants-that-could have seemed to survive the elements.  I even noticed several zucchini growing the other day: 


We started small this year--some zucchini, some banana squash, tomatoes, and a few herbs.  Hopefully next year will be even bigger.  And eventually we'll find a more aesthetic solution for a wind break.  A picket fence maybe?  I'm scouring Pinterest daily for ideas.  

If you are interested in making your own vinyl garden boxes, may I recommend this tutorial.  And may I also recommend skipping Home Depot or Lowes and looking to a local fencing supply company for materials.  It was over 1/3 cheaper for us to go that route.  If you have any additional questions, please feel free to ask in the comments.

Thanks for stopping by!

Thursday, July 17, 2014

Dining Set Makeover

So, here's the dining set before:
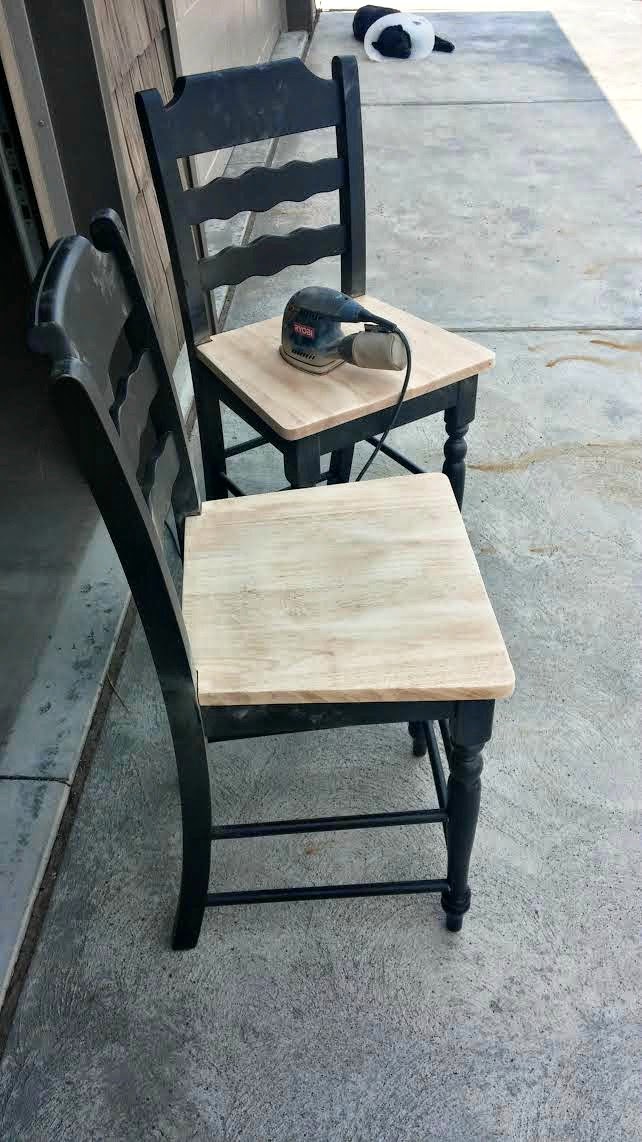
We got it on Craigslist for a steal, but it was not the style I wanted, so I decided to give it a makeover.  I started with the chairs.  I used my handy dandy handheld sander and took the finish off the seats:

Here's a sanded one next to a still stained one:


I timed the process, and it was about 10 minutes on the nose to completely sand a chair seat.  Not too bad of a time commitment, for such a drastic change.


Once the seats were sanded, I lightly sanded the legs and backs of the chair.  Lightly meaning I just ran quickly over it with my palm sander so that the paint was roughed up just a touch.  Don't spend more than a minute on it, because it's unnecessary to do more than just a once over.  I covered the seats completely with paper and Frog Tape to protect them during the next several steps.  I used my kids' construction paper, because it's what was handy.


Next, I used spray primer to cover the black parts of the chair.  I loved using Rustoleum's Painter's Touch 2X's Ultra Cover primer in flat white.  I didn't worry about completely covering any traces of black.  I just did a light coat so that the paint would have something to stick to.


I let that dry for an hour or so, and then I went at it with my spray paint color.  I used Krylon's Catalina Mist.  And I'll tell you two things.  1) I LOVE the color. 2) It is not great quality spray paint.  It runs easily and doesn't provide great coverage.  Rustoleum knocks it out of the park with coverage and non-runniness.  Krylon, not so much.  So, it took a lot of really light coats to get it all covered, and I ended up averaging an entire can of spray paint per chair.  So, although I do love the color, I'd say if you can find a color you love in a Rustoleum can, I'd definitely vote you go for that one instead.  The Catalina mist was also ridiculously hard to find (and then find again when I ran out part way through the project).  So, for what it's worth.  Great color.  Not great quality.  I was warned by lots of reviewers on Amazon and other sites, but I wanted the color badly enough that I was willing to put up with the poor quality.  I won't be doing that again, though.  Not worth it in my book.

When everything was all dry, I removed the paper and tape off the seats and gave it 3 coats of polyacrylic, which I found here and love.

So, that's the chairs.  The table was a very similar story.  I detached the legs, carried everything out to my workshop (a.k.a. the garage where I should really be parking my car), and went to town.  I sanded the top down, then I covered the entire top with paper and tape and spray primed the base and legs with the Rustoleum primer, followed by several coats of Rustoleum spray paint in white.


Again, I cannot state emphatically enough how awesome Rustoleum covers and goes on compared to Krylon.  And, no, Rustoleum has no clue who I am and I'm not getting paid to say that.  It's just true.  After the paint dried, I removed the paper and did 4 or 5 coats of polyacrylic over the natural wood top.

After everything dried, I brought it all back in, reassembled it, and let it cure for a week while we went on a planned vacation.  We came back to a fully functional and much brighter dining set.


Any questions?  Put them in the comments and I'll do my best to answer them!